


- Homepage
- Projects
- Autodesk Construction Cloud/BIM 360
- BIM 360 Quick Start Guide
BIM 360 Quick Start Guide
- ACC Quick Start Guide
- ACC Document & File Review Workflow
- How to upload files in ACC
- BIM 360 Quick Start Guide
- BIM 360 Account Setup Instructions
- BIM 360 Plan Review Process
- BIM 360: Creating, Tracking, and Closing Project “Issues”
- BIM 360 Sheet Name/Number & Document File Versioning
- BIM 360 Standards Variance Request
- Change Order Proposals Over $50K
- Sign into the BIM 360 Mobile App (iOS)
- Autodesk Desktop Connector
- Adding New Employees to Tracker & BIM 360
If this is the first time you’re using BIM 360 Docs, here are a few things you need to know:
- These instructions are specific to how we’re using BIM 360 Docs at UF for Design Review & Permitting
- You can view training videos on select UF BIM 360 Docs processes at our YouTube Channel
- For questions and to report issues related to the UF BIM 360 site, use the BATS Help Desk
- For general BIM 360 Help and training provided by Autodesk, please see the links below
- It is strongly recommended that you use a current version of the Google Chrome Web Browser
Design Review & Project Initiation
BIM 360 Docs is currently being used for electronic Design Review, including the Building Permit Application, and for managing the construction process. All new projects created in the UF Project Tracker system automatically generate a corresponding BIM 360 site. UF project managers can request the creation of a BIM 360 site for existing Tracker projects by clicking the “Request BIM 360 Site” button on the Tracker “Team” page. Team members can be added to the BIM 360 project at any time by clicking the BIM 360 check-box on the Tracker Team page. Also, Team members needed for reviews by UFIT, Physical Security, and other groups can be added using the corresponding buttons found at the top of the Team page.
Building Permit Process
The information needed to start the Building Permit Application process is automatically sent from Tracker to the EH&S department when the BIM 360 project is created. The more complete the information is in Tracker, e.g., A/E/CM name, building number, etc., the quicker the Permit Application can be processed.
Document Management: Folder Structure, Files & Upload/Edit Process
There are two parent folders in every BIM 360 project: “Plans” and “Project Files.” The Plans folder (and its sub-folders) is used to upload, review and manage the latest set of construction drawings in both 2D and 3D formats. It is the digital equivalent of a printed set of contract drawings for a construction project. The Project Files folder (and its sub-folders) is used for everything else related to the design review project: requirements, specifications, photos, etc. PMs and others who want to be notified when new files are added to these folders should “Subscribe” to the appropriate folder(s) in the BIM 360 project.
Folders versus Sets
You can view files in the Document Management module by Folders or Sets. UF is using Sets for drawings, plans, markups and issues. Major, minor, and JOC projects will have preconfigured Sets ready for use for all new projects as follows:
Sets for Major Projects:
|
Sets for Minor Projects:
|
Sets for Job Order Contracting (JOC)* Projects:
*JOCs were formerly known as Quick Response (QR) projects. |
|---|
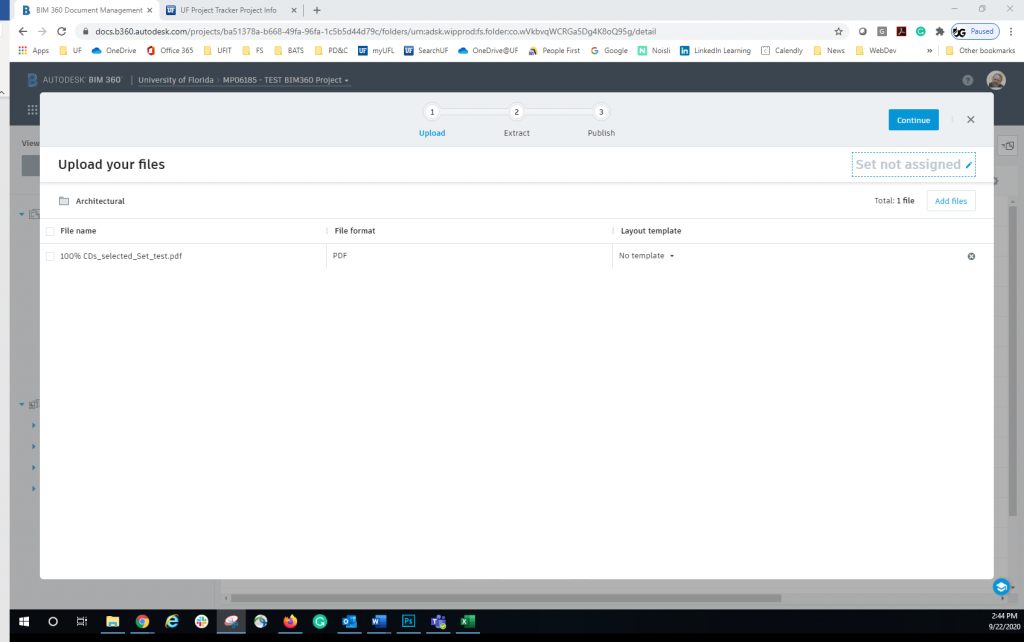
These Sets are meant to provide some uniformity and serve as a starting point. Please use the BATS Help Desk if you need to add or delete Sets or rename existing Sets. Be sure to enter the correct Set name in the “Set not assigned” field directly below the blue “Continue” button on the “Upload your files” page. If you accidentally upload your files to the wrong Set, you can use “Edit Set Assignment” to move files from one Set to another Set.
Plans (parent folder)
The following sub-folders by “discipline” are preconfigured in the Plans folder:
- Architectural
- Civil
- Landscape
- MEPFP
- Structural
- Survey
- Technology
Please upload your files into the applicable folder and enter the correct Set name in the “Set not assigned” field during the upload process:
Project Files (Major and Minor Projects)
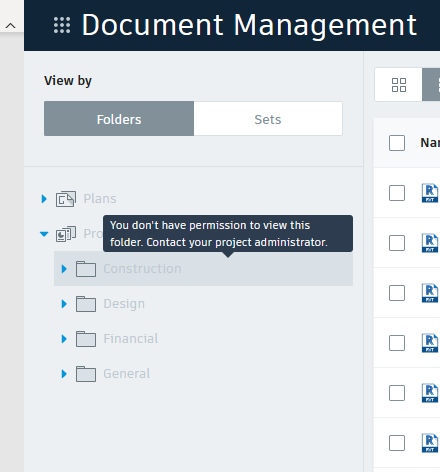
The following sub-folders appear in the Project Files parent folder for Major and Minor Projects, for those with the highest access levels, e.g., UF Project Managers. All other users will see a more limited set of these sub-folders, depending on their role in the project. If the user encounters a folder with a “grayed-out” look and the “You don’t have permission to view this folder” message, they should click the blue arrow to the left of the folder name and expand the list until they find a folder they can access.
The following sub-folders are preconfigured in the Project Files folder:
* Folders not accessible by non-UF project members
Construction
|
Design
|
Financial
|
General
|
|---|
Uploading Design Documents
The vendor (Architect, Engineer, Construction Manager, etc.) uploads design documents to the appropriate sub-folder and assigns the documents to the appropriate Set in BIM 360. The PM should request that the vendor upload the Revit (.rvt) file whenever possible. The vendor informs the PM that files are ready to be reviewed using the “Create Transmittal” function, which sends the PM an email with a link to the files to be reviewed.
Reviewing Design Documents
After checking the files and verifying that they have been uploaded correctly, the PM “Submits (the files) for review” using one or more of the approval workflows:
- EH&S Code Review
- FS Standards Review
- FS Standards Variance Request
- HealthNet (HNET) Review
- Physical Security Review
- Space Review
- UFIT – AT (Academic Technology) Review
- UFIT – ICT (Networking) Review
- EH&S RFI or Shop Drawing Notification
- FS RFI or Shop Drawing Notification
It is important that the vendor DOES NOT UPLOAD A NEW VERSION OF A DOCUMENT (FILE) INTO THE PLANS FOLDER AREA THAT IS CURRENTLY UNDER REVIEW. BIM 360 will automatically substitute the newer version of the document into the Review documents queue, making it difficult for the reviewers to complete the review of the submitted documents. Users should check the status of the review by clicking on the “Reviews” tab to verify the review is CLOSED, or check with the UF PM, before uploading a new version of the document. If an updated version of a document under review needs to be checked by the UF PM before the review being closed, it can be uploaded temporarily to Project Files > Design > Misc – Other Design.
The Review Process and Assigning Issues
Inspectors (and other reviewers) use “Issues” to indicate and track problems that need to be addressed. Issues can be assigned to an individual with a Due Date and a status (Open, Answered, Closed).
The standard workflow for Issues:
- Reviewers create Issues with a status of “Open” and assign them to the UF Project Manager
Note: all project members can see all Issues. To expedite the review process, UF PMs assign Issues to vendors as they are created. - The vendor is notified by system email that they have been assigned Issue(s). Issues remain in Open Status.
- The vendor can re-assign Issues to the appropriate project members as needed. Issues remain in Open Status.
- The project member assigned the Issue provides a “Response” and changes the status to “Answered,” but leaves themselves as the Assignee. The Issue Owner (Creator) receives an email due to the change in status.
- If the response is satisfactory, the Issue Owner changes the status to “Closed.” If the response is not satisfactory or needs clarification, the Owner changes the status back to “Open,” adds their comments, and reassigns the Issue back to the UF PM, which generates an email and alerts the PM about the change is status.
- The Review Manager closes the Review when all or most of the Issues have been “Closed.” Some Issues may remain in “Open” or “Answered” status as a reminder to be addressed at a later date.
- The Reviewer Manager notifies the UF PM when the Review has been completed by submitting and closing the Review Approval, which sends the PM a system email.
- EH&S notifies the UF PM when all (or most) Issues have been resolved and a Permit can be issued by uploading the Letter of Code Compliance to Project Files > General > Correspondence and then using the Transmittal function, which sends the PM an email with a link to view the Transmittal, in addition to adding an entry in the system’s Transmittal log.
Please see “BIM 360 Plan Review Process” for more information.
Additional BIM 360 Training and Online Tutorials
General BIM 360 training and tutorials are available via the Autodesk website at https://learnbim360.autodesk.com/ and LinkedIn Learning for UF Faculty and Staff. You can also get Help and accesses Learning modules from within the application by clicking on the ? icon in the upper right corner of the Browser application window:
![]()